Seedance 2.0 Beginner Guide: Your First AI Video in Under 10 Minutes
You’ve seen AI-generated videos flooding your social feeds. Cinematic product demos. Animated explainers. Scroll-stopping ads that look like they cost thousands to produce. And you’re wondering: can I actually make these myself?
Yes. And it takes less time than you think. Seedance 2.0 — ByteDance’s AI video generation model released February 2026 — can turn a text description into a polished video clip in under 60 seconds. No video editing experience required. No expensive software. No film school degree.
This guide walks you through everything: what Seedance 2.0 actually is, how to create your first video step by step, and the tips that separate amateur-looking outputs from professional results
What Is Seedance 2.0 (and Why Should You Care)?
Seedance 2.0 is an AI model that generates video from text descriptions, images, or a combination of inputs. Think of it like ChatGPT, but instead of writing text responses, it creates video clips
Here’s what makes it different from earlier AI video tools:
- Director Mode — control camera movements (pan, zoom, tracking shots) with natural language
- Quad-modal input — feed it text, images, video clips, or audio as starting points
- 2K resolution — sharp enough for professional use, not just social media
- Native audio sync — generated videos can include synchronized sound
- ~$0.42 per clip — through API access, or free/low-cost through platforms like Seedance
The practical upside: a video that would cost $500-$2,000 to produce traditionally can now be generated in about a minute for under a dollar.
The 5 Ways to Create Videos with Seedance 2.0
Before you start, it helps to understand the five input modes. Each one suits different situations:
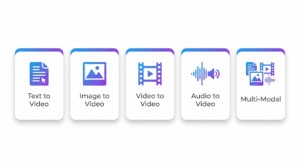
- Text to Video — Type a description, get a video. Best for: quick concepts, social media content,brainstorming visual ideas.
- Image to Video — Upload a photo, and Seedance 2.0 animates it. Best for: product photography that needs movement, turning illustrations into animations, bringing static designs to life.
- Video to Video — Feed in an existing clip to transform its style, extend it, or modify elements. Best for: repurposing content, style transfers, extending short clips.
- Audio to Video — Provide music or voiceover, and the AI generates matching visuals. Best for: music videos, podcast visualizations, audio-driven content.
- Multi-Modal — Combine any of the above. Upload a reference image AND provide text instructions AND add audio. This is where the real power lives — and what we’ll focus on.
Step-by-Step: Your First Video in 10 Minutes
Let’s create an actual video. I’ll walk through the exact process using a product demo as our example — the most common use case for beginners.
Step 1: Access the Platform (2 minutes)
Go to SeedanceAI.me. Create an account if you haven’t already. The interface is straightforward — you’ll see a text input area and options to upload reference materials.
No software installation. No GPU requirements. Everything runs in the cloud.
sStep 2: Write Your Prompt (3 minutes)
This is where most beginners go wrong — they write prompts that are too vague. Here’s the difference:
Bad prompt: “A video of a coffee cup”
Good prompt: “A ceramic coffee cup on a wooden table, morning sunlight streaming through a window, steam rising from the cup, camera slowly zooms in, warm color tones, cinematic depth of field, 5 seconds”
The good prompt includes:
- Subject — what’s in the frame (ceramic coffee cup)
- Setting — where it is (wooden table, window)
- Lighting — what the light looks like (morning sunlight)
- Motion — what moves (steam rising, camera zooms in)
- Style — what it feels like (warm tones, cinematic)
- Duration — how long (5 seconds)
Step 3: Add Reference Images (Optional but Recommended — 2 minutes)
If you have a specific product or style in mind, upload 1-3 reference images. This dramatically improves output quality. For our coffee cup example, uploading an actual photo of your product tells Seedance 2.0 exactly what it should look like — rather than generating a generic cup.
Step 4: Configure Settings (1 minute)
Choose your output settings:
- Resolution: Start with 1080p for testing, scale to 2K for final output
- Duration: 5-10 seconds is the sweet spot for most use cases
- Aspect ratio: 16:9 for YouTube/web, 9:16 for TikTok/Reels, 1:1 for Instagram
Step 5: Generate and Iterate (2 minutes)
Hit generate. Your first clip will render in 30-60 seconds. Watch it. Is the camera movement right? Is the lighting what you wanted? If not, adjust your prompt and regenerate.
The key insight most tutorials miss: your first generation is rarely your final output. Plan for 2-3 iterations. At roughly $0.42 per clip, three attempts cost $1.26 — still infinitely cheaper than hiring a videographer.
7 Tips That Separate Amateurs from Pros
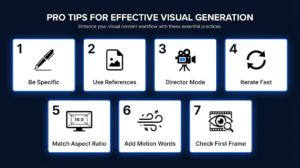
- Be ridiculously specific. “A woman walking” gives you something generic. “A woman in a navy blazer walking through a sunlit Tokyo street, cherry blossoms falling, shot from a low angle tracking camera” gives you something you can actually use.
- Always use reference images for branded content. If you’re making product videos, upload your actual product photos. The AI can’t read your mind about what your product looks like.
- Learn Director Mode commands. These camera instructions transform amateur clips into cinematic ones: “slow pan left,” “dolly zoom in,” “tracking shot following subject,” “static wide angle.” Camera movement is what makes AI video look professional.
- Iterate fast, don’t perfect a single prompt. Generate three variations quickly rather than spending 20 minutes perfecting one prompt. You’ll learn what works faster by seeing multiple outputs.
- Match aspect ratio to platform. This sounds obvious but most beginners forget: 9:16 for TikTok and Instagram Reels, 16:9 for YouTube and websites, 1:1 for Instagram feed posts. Getting this wrong means awkward cropping later.
- Add motion-describing words. Words like “flowing,” “drifting,” “sweeping,” “pulsing,” and “emerging” give the AI clearer motion instructions than static descriptions.
- Pay attention to the first frame. The opening frame of your AI video sets the composition for everything that follows. If the first frame looks wrong, regenerate rather than hoping the video improves midway.
Common Mistakes (and How to Avoid Them)
Mistake #1: Prompts that are too long. There’s a sweet spot between too vague and too detailed. If your prompt is over 100 words, the AI may ignore some instructions. Keep it under 75 words and prioritize the most important visual elements.
Mistake #2: Expecting Hollywood quality on the first try. Seedance 2.0 is remarkably good, but it’s not magic. Plan for iteration. Budget 3-5 generations per final clip. That’s still $1.26-$2.10 per finished video — a fraction of traditional production costs.
Mistake #3: Ignoring audio. A beautifully generated video with no sound (or mismatched sound) looks unfinished. Use Seedance 2.0’s native audio sync feature, or at minimum, add appropriate music in post-production.
Mistake #4: Using AI video for everything. Some content still works better as static images, text, or traditional video. AI video shines for product demos, explainers, social media hooks, and visual storytelling — not talking-head interviews or precise technical demonstrations.
What to Make Next: 5 Projects for Beginners
Once your first video works, here are five projects to build your skills
- Product showcase video — animate your best-selling product from multiple angles (most practical for immediate ROI)
- Social media hook — create a 3-second attention-grabbing intro for your next Reel or TikTok
- Before/after transformation — use image-to-video to animate a static comparison
- Explainer animation — turn a complex concept into a simple visual sequence
- Brand intro clip — create a 5-second cinematic logo reveal with Director Mode camera movements
Each project teaches you different aspects of the tool — prompt writing, reference image usage, Director Mode, and output optimization.
Getting Started Today
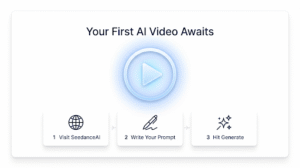
The gap between “I’ve never made an AI video” and “I just published one” is exactly 10 minutes. Here’s your quick-start checklist:
- Visit SeedanceAI.me and create an account
- Pick one of the five project ideas above
- Write a specific, detailed prompt (subject + setting + lighting + motion + style)
- Upload a reference image if you have one
- Generate, review, iterate
The hardest part isn’t learning the tool — it’s hitting “generate” for the first time. Everything after that is iteration.
Seedance 2.0 doesn’t replace creativity. It removes the technical and financial barriers between having a video idea and seeing it come to life. Your first AI video won’t be perfect. But it will exist — and that’s worth more than a perfect idea that never gets made.
Seedance 2.0 launched February 10, 2026. This guide reflects features and pricing as of March 2026. Interface and capabilities may evolve as the platform updates.